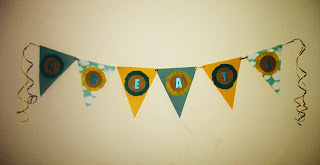
I decided in honor of my 100th follower (thanks Samia!). I would post a tutorial for a fun paper bunting! I made one for Ariana's First Birthday and loved how it turned out. I decided it would be something fun I could share with y'all. This is my first tutorial so bear with me!
You can make this be a birthday banner, put some inspiration word on there, or just leave it simple for a pretty decoration. In this post I'll show you how you can make a pretty basic one, but of course feel free to jazz it up if you like and change things up to suit your taste.
Here is the one I made for this tutorial.
Here is the one I made for Ariana's birthday last November.
Ok, let's get started!!!
Here is what you will need:
-coordinating paper
-plain paper for background for letters
-letters (stickers, chipboard, stamps etc)
-coordinating streamers (I used 2 colors)
-coordinating curling ribbons (I used 2 colors)
-glue
-scissors
-pen
(not pictured) something to trace a circle, I used a glass.
Also a ruler to measure your triangles.
I like to choose 3 coordinating papers. 1 pattern and 2 solid colors. You can choose all solid or all patterned. Whatever you feel like!
First cut out your triangles. Mine were about 8 1/2 inches across the top and about 11 inches measuring from the middle down to the tip.
Use your first triangle as a pattern to trace your other ones if you want.
I didn't like the color of my letters so I choose to paint them to match.
Then, use something round to cut out circles to be the background for your letters. Make sure it's big enough so that your letters fit on there but that you also have room when you put it on the triangle so that you can put the streamers behind it.
I used a glass to trace my circles, and then just cut them out.
Now it's time to start putting it all together!
First step in making your triangles is to make a circle out of glue.
Layer your streamers into a circle shape on the glue. Kind of bunch it up as you go along. Don't worry about it looking perfect, it won't! Be careful once you start layering it onto the glue and it gets wet it can be hard to reposition because it starts to fall apart because it's so thin.
Next add another little bit of glue on top of the streamer circle and put your paper circle on top.
Finish it off by adding your letters.
Then, punch holes at the top of each triangle.
Measure your coordinating ribbons so that it's long enough to hold all the triangles and has enough left over on each side to hang it with.
Begin threading your triangles onto the ribbons.
And, TA-DA!!! You're finished! Now you have a pretty paper bunting!!
I'm sure this wasn't the best tutorial you've ever seen but I hope I made this pretty clear and didn't confuse anybody. I hope you like it and use it next time you have a party or just want something pretty to hang up!
~~~~~~~~~~~~~~~~~~~~~~~~~~~~~~~~~
Tomorrow is the first day of COLOR WEEK on my blog! If you missed the post. Here is all the information about it.
The color for tomorrow is RED!
I can't wait to see all the red things in your world! I'll be posting my pictures tomorrow night!
xo's
Cat
♥♥♥


Thanks for the tutorial! It's easy to follow and will definitely come in handy when I need it! :)
ReplyDeletevery very cute :)
ReplyDeleteAwesommme! I love the crepe paper touch you added. So cool.
ReplyDeleteVery cute. I did one for autumn, but I used fabric instead of paper. I blogged about it, way back in October, I think.
ReplyDeleteThat banner is awesome!
ReplyDeletegood job girlie! :)
ReplyDeleteDee
ohh this is super cute and cool!
ReplyDeleteim joining the color week!! <3
i HAVE TO!
I've blogged about my colour challenge for the day!
ReplyDeletehttp://evershiningstar.blogspot.com/2010/06/colour-challenge-reds.html
very cute!
ReplyDeleteCarrie
This is super cute...I love bunting.
ReplyDelete