Photobucket      Photobucket      Photobucket      Photobucket      Photobucket      Photobucket      Photobucket      Photobucket
Showing posts with label baby projects. Show all posts

Tuesday, September 3, 2013

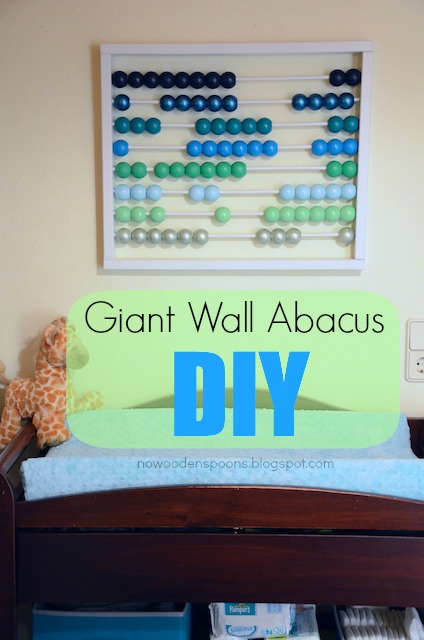
Giant Wall Abacus DIY


About half way through my pregnancy when I was searching for things to decorate the nursery with I kept stumbling upon wooden abacus toys. I liked the idea of making a giant wooden abacus for his wall above his changing table. For a while I wasn't sure how I was going to make it, but then with some help from my husband it all came together. 

This really became a family project with everyone helping, even Ariana painted some beads. I really love how it turned out and wanted to share how we made it. It's not as hard as it looks and it's great because you can customize the colors to match whatever room you are displaying it in.

So, let's get started!

Giant Abacus Wall Decor

Supplies:
- Piece of wood measuring 1.75 x 1in and at least  84 inches long - cut into 4 pieces total. 2, 18 inch pieces and 2, 24 inch pieces.
- Wooden beads. I ordered 100 of these 38mm/1.5 inch beads with a .5 inch hole from here. (We only used 80)
- Wooden dowels. We got our from the local hardware store 8mm/0.25inch in diameter and 23 inches long. We used 8 dowels.
- Paint and paintbrushes (white for frame, colors of choice for beads)
- Clear Gloss Spray Paint
- Drill and 8mm drill bit
- Ruler and pencil
- Nails and hammer

Optional Supplies:
Saw (to cut your wood or dowels if not precut)
Sandpaper
Newspaper or wax paper (for drying your painted wood on).


For bead colors I used these paints:

Craft Smart Acyrlic Paint - Mint Green (diluted with white)
DecoArt Dazzling Metallics silver sage (painted over white base)

Note: Our giant wall abacus measures 24x18, and has 8 rows of beads. The following directions are for this exact abacus. If you want your abacus smaller or bigger use these directions as a starting off point.


1. Once you've bought all your supplies make sure your wood is cut to the sizes you need. Remember you will need 2, 18 inch pieces for the sides of your frame and 2, 24 inch pieces for your top and bottom. Your dowels need to be cut to measure 23 inches long.

2. On your 18 inch pieces of wood (your sides) use your ruler and make a mark in the center of your wood at the top and bottom. Using your ruler, connect the marks and make a line running down the center of your wood. Along the center line measure length wise and make 8 marks, 2 inchs apart. This is where you will drill holes for your dowels to go.


3. Make a mark 0.5 inch down on one of your dowels. Using your drill, along the marked spots, drill about 0.5 inch down on each piece of wood. Be careful to make sure the holes are straight and centered on each point that you made so they are centered. Check the depth using your dowel with the 0.5 inch mark. Your drill holes have to be at least 0.5 inches deep but it's okay if they are a little deeper.

4. If you need to, using the sandpaper, sand any rough edges you have on your wooden frame pieces and dowels. My wooden beads came very smooth so they didn't need any extra attention.


5. Now you can start painting! Painting your frame pieces white and your beads the colors of your choice. Each row will have 10 beads of a certain color. We made 8 rows of 10 beads each, so we used 80 beads in total. Add a second coat as needed.  Let them dry as directed.


6. Once all your pieces are painted and dry, outside or in a well ventilated area, use your clear spray paint to give them some shine. We only had to use this on our beads. The white paint for our frame was a semi- gloss and we thought it looked okay like it was. More drying, more waiting. This was the worst part.


7. You're almost done! Nail together one of your short pieces of wood to both of your long pieces. Then stick the dowels into the holes on the short piece of wood.

8. Thread your beads onto the dowels in the color pattern you want.

9. Once you have your beads in place, put the second short side onto your dowels. This part is a bit tricky lining up all the dowels exactly right and siding them into place. Once that is done you can hammer the last 2 corners. (I didn't take pictures of this part because it required a bit of work)

10. Attach a hanger on the back of your abacus and you are done! We used 3 sawtooth hangers on ours because it's pretty heavy. Hang and enjoy!


**Note this abacus is not made to be baby proof. This is for decoration only.


Pin It!

Tuesday, August 20, 2013

How I Made My Baby Quilt


A few weeks ago I posted the triangle baby quilt I made for our little mister. I'm back today to share some details on how I made it. 

I made my quilt with help from blog posts here and here and this video about hand stitching the binding.

I ordered my fabrics from fabric.com. They are Kona Cotton in colors grass green, white, medium gray, teal blue, aqua, caribbean, nightfall and green tea. I got half a yard of each color except for the back fabric where I got an extra 2 yards and the binding which I had on hand already.


I used this white thread for my basic sewing and this lime green thread for my accent color. This hand quilting thread was used for the binding.


I spent a whole day cutting out all the triangles. They measure 6 inches. Then I stacked them up by color and began laying them out into a pattern. Some people just sew them together as they go not really paying attention to the layout, but I wanted mine pre-layed out so I would know what the outcome would be.


Ariana helped me find the right pattern. There are 17 triangles in each row and there are 11 rows. I stacked each row up and labeled them to keep track of how I want my layout to be.


Then I began sewing the triangles together. I started with sewing the triangles in each row first, then sewed the rows together (row 1 and 2 together, row 3 and 4 together) to make sets.


This was the fun part because you could start to see it coming together and lining up nicely. Not all the triangles lined up perfectly but they were close enough.


And then before I knew it, I had a quilt top. This is when I really kicked it into high gear. Seeing the quilt top come together really made me fall in love with it even more and I couldn't wait to see the whole thing finished!

Then I had to sandwich the top layer, the batting and the back together and sew it all together.


I went along each side of each triangle because I figured that since it was a baby quilt it would have a lot of wear and tear and washing and this would help it hold up. Then I hand stitched on the binding and it was done. You can see the rest of the finished quilt in my post here.


Pin It!

Tuesday, July 30, 2013

A Quilt for Little Mister! (& 34 weeks)

I'm not a seamstress y'all. I don't really sew, but...
I MADE A QUILT! 

I'm pretty proud of this project! I know it's the biggest sewing project I've done, and I'm pretty sure it's the biggest craft project I've EVER taken on.


I knew I wanted a pretty triangle quilt for the little mister when I found the first thing (a print) that inspired the nursery. I kept finding all these pretty quilts on Etsy but man were they pricy and none of them were exactly what I wanted. 

I knew I wanted to make my own triangle quilt when I thought about how simple it would be and how much I (and hopefully he) would love it. 

I haven't shared the nursery yet. It's still a work in progress but I'd say I'm 90% done. Just waiting on a few things to arrive in the mail and finding a rug has been frustrating to say the least. This quilt really brings it all together and I smile everytime I see it in there.


This truly was a labor of love. Hours upon hours of cutting, measuring, pinning, sewing, work. It was both harder than I thought it would be, and easier than I thought it would be at the same time. 

My blood, sweat and tears went into this quilt. Literally.
Blood - I pricked myself several times and cut myself once with my rotary cutter.
Sweat - I've been working on this on and off for the past month and a half in the 90 degree heat (with no air conditioning)
Tears - Ok so no as many tears but a few hot mad tears when I made a simple mistake and had to fix it and giddy tears when I got so close to the end and I was still in love with it.


I practically flew through the last of it once I got the quilt top put together. I could barely stand it I loved it so much. 

Sewing around each triangle was pretty time consuming but I love the way it looks and hopefully this will hold up nicely.

He's going to be very cozy this winter with his quilt and the baby blanket I crocheted a few months ago.


I'm working on a post to share my progress through the quilt and the methods/tutorials I used etc. But the colors are greens, aquas, turquoise, gray and white.

Not all my lines are straight but it's made with love and it's perfectly imperfect. I'm in love with it!


And since I'm feeling pretty round and pregnant these days, here is a photo of me from yesterday at 34 weeks. Technically I still have 6 weeks until my due date but I'm guessing he's going to come earlier than that. I have a growth ultrasound later this week to measure how big he is getting!

(34 weeks)


Pin It!

Monday, June 3, 2013

MY Nursery Inspiration Boards

I'm 26 weeks pregnant (as of yesterday) and I've started to think about designing the nursery for this new little bundle. I'm so excited to be sharing what I've been doing on the The Shopping Mama lately. 

I've been having so much fun searching the internet to create these unique nursery inspiration boards.


Richard really loves this space and exploration themed nursery I came up with. Green, orange, grays, and blues and lots of rockets and stars pull this all together. I love the modern rocker and crib too! If you like this nursery board, see more about my starstruck baby inspiration board here. There you can find all the links to the goodies I've featured in this dream nursery.


This was the first one I came up with. Rustic, warm colors with some cute forest critters and you've got a woodland themed nursery for your little one. Seriously how cute is the plush fox and that mushroom lamp!? If this is more your fancy, you can find out more by checking out my woodland friends inspiration board. All the links to these warm and cozy nursery decor can be found there.

Pin It!

Friday, May 24, 2013

Baby's First Blanket

When we found out we were pregnant, I knew I was going to want to make some things for this baby. I waited to find out if it was a boy or a girl before I started anything.

My first project that I've completed is this crocheted baby blanket.


I found these gorgeous and soft yarns at our BX one day and knew these were the colors I wanted. 
They are Red Heart Soft Baby Steps in Baby Blue, Baby Green and White.

I bought 2 skeins of each color, 6 skeins of yarn total and used it all.


I did a simple single crochet using all three yarns at the same time using a large size P crochet needle. The effect was really pretty and created a really bulky warm blanket for our September baby.


It came together pretty quickly when I actually had time to sit down and crochet it (usually while I was catching up on some of my favorite shows. Anybody else love Scandal!? Addicted! I have 2 more episodes left.)


It ended up being pretty large, measuring 52x42 inches but it's perfect.

 I can't wait for our little boy to be snuggled up with it!


Pin It!