Photobucket      Photobucket      Photobucket      Photobucket      Photobucket      Photobucket      Photobucket      Photobucket
Showing posts with label tutorial. Show all posts

Tuesday, July 16, 2013

Night Sky Photography Tips


I am by no means a professional when it comes to night sky photographs. I'm only just starting to really get into experimenting with night sky photos myself.  A lot of it has to do with the fact that I don't go outside in the middle of the night and play around with it much. If only it got darker here sooner in the summer. it's still dusk at 10:30. I thought I would share what I learned through trial and error.

We went to Sardinia last week and we were in a pretty remote beach area, good for viewing and photographing the stars. I took my camera out and did a little playing around. I've tried my hand at it before but not as long and not in as good of a rural area.

 Here are some of my images and my tips I found useful and thought I could pass along to another amateur night sky photographer.

ISO 1000     f/1.8      15s      50mm      no flash
 ISO 3200      f/1.8      8s      50mm      no flash


What you will need:
Tripod - You will be keeping the shutter open for a long time so this is necessary for keeping your images crisp.

Shutter remote - Another necessity to keep you from jiggling the camera when pressing the shutter release button. 

Lens with low aperture setting - I used a fixed 50mm lens but I also used my kit lens for one.

Dark, cloudless sky - although some clouds can look cool in night photos. Maybe I'll do another post on that soon.

Patience - lots and lots of patience.

Small Light - I used a small flashlight in setting up my equipment and checking my settings etc. Plus walking in the dark wasn't fun.

 ISO 1250      f/3.5      15s      18-105mm      no flash
Big Dipper

ISO 100      f/1.8      383.5s      50mm      no flash

Tips for Night Sky Photography:
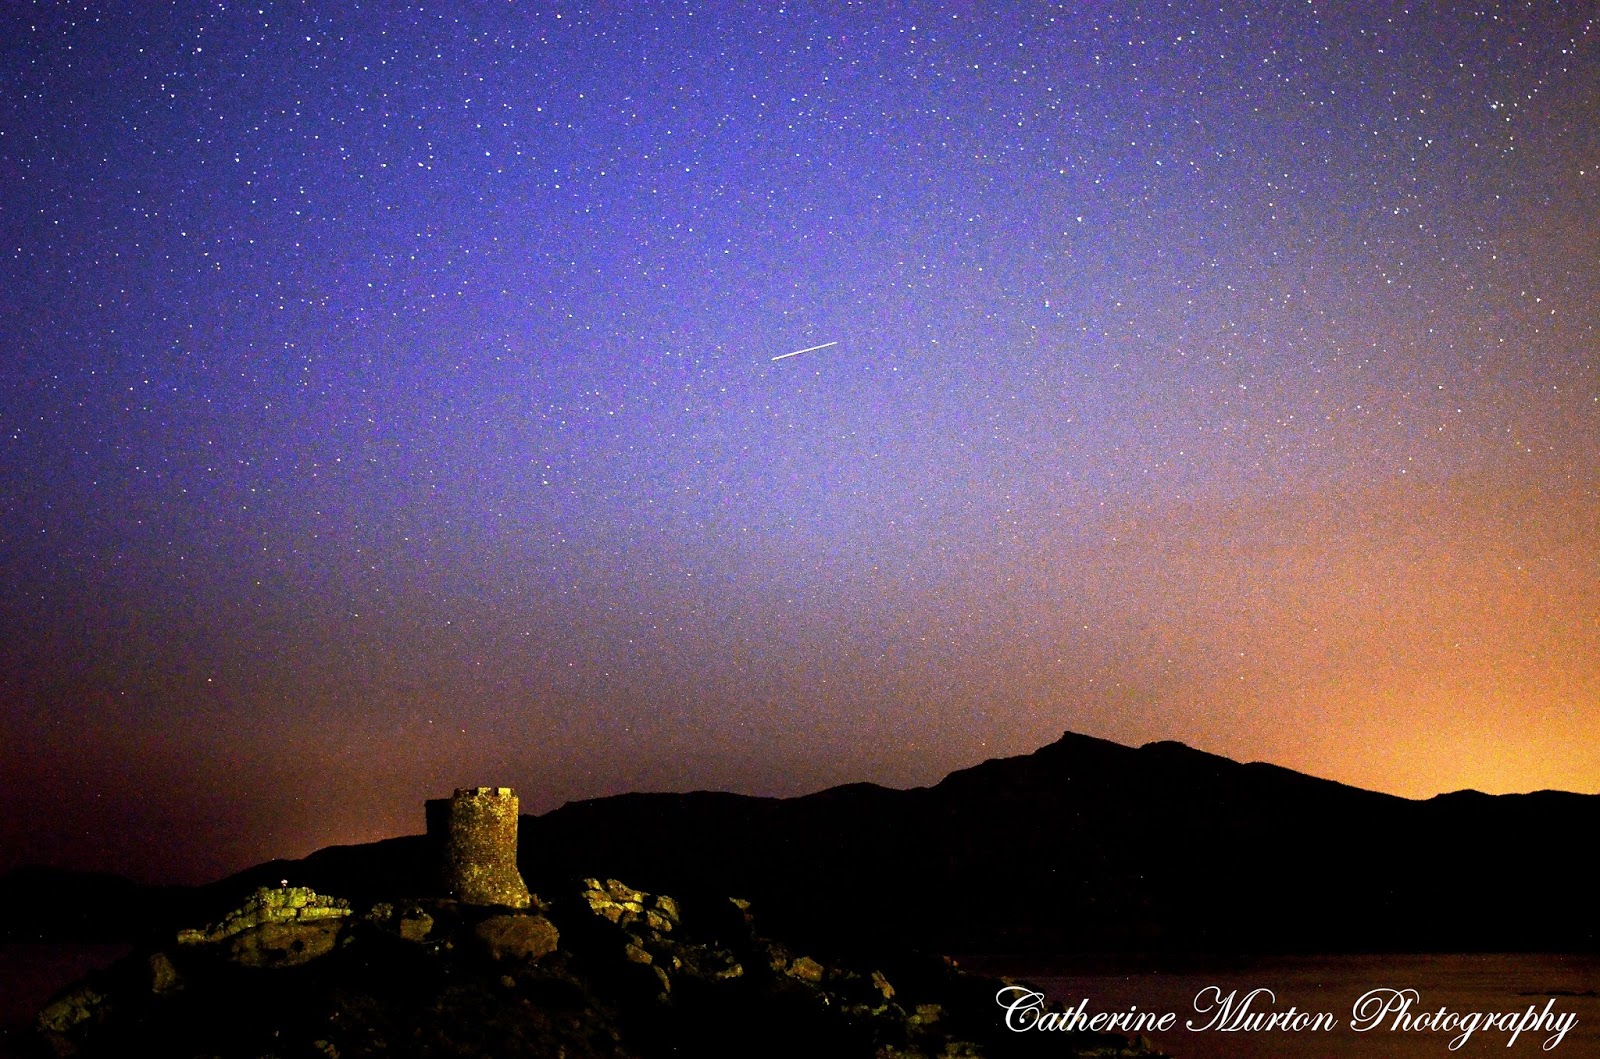
The first thing you need to do is wait for a dark night with no clouds. You'll get better shots away from any street lights, houses, etc because those lights give off light pollution. The further out away from any lights the better your photos will be, otherwise you might end up with some strange orange glows in some of your photos. That can be okay sometimes as in my picture with the tower and shooting star. It may look completely dark to your eye but your camera will pick up some fragments of light.

Set up your equipment, pointing the camera away from city lights and take a few test shots. See what it looks like and tweak as necessary. I started just pointing at random points in the sky and played around with my settings.

Remember your ISO can be in the low or middle range. Mine ranged from 100 to 3200 to help get more starlight coming through your camera depending on the image I was trying to capture. Don't use your flash.

Auto focus won't work on stars so don't even try it. Set your camera/lens to manual and what I found worked for me was to focus at infinity and then move it back just a little bit. On some brighter stars I could see them in my viewfinder and focus on them manually but most the time I felt like I was just guessing on the focus. That's okay too. That's where your patience comes in.

Once you get your stars in focus set your shutter speed to different settings to see what you like. Start with 5, 10, 30 seconds. If you choose to try longer shutter speeds you'll have to set your camera to bulb and have a way to time yourself. I'm not very patience when having to wait minutes for one photo. The longest I think I've done was about 6 minutes.

If you're lucky you might even get a shooting star in some of you photos! There might be planes that also fly through your frame and they aren't as pretty. Aim towards different areas to see what composition you like or what you can capture.

For star tracking (which shows the movement of the earth) you'll want to keep your shutter open for longer. To create a circle pattern, shoot towards the north star (see above). The further away from the north star, the longer the trails look.

ISO 100      f/2.5      301.4s      50mm      no flash

Hopefully these tips will help you when starting out with your own night sky photography. Have fun playing around with it and see what works best for you in your area. Just remember it takes some trial and error and a lot of patience so don't get discouraged, keep at it. I'm hoping to try my hand at some more night photography again soon.


Pin It!

Tuesday, November 15, 2011

Autumn Lanterns {tutorial}

These Autumn lanterns are pretty and easy to make. And perfect for Thanksgiving!

First you need to gather some pretty colorful fall leaves.


Make sure they are dried well and not damp from being outside on the ground.


Lay them between pieces of newspaper and stack heavy books on top of them for a few days to press them flat and help dry them out.


Once the leaves are dried a few days later, you can start the work on your lanterns. Gather up your supplies: glass mason jars, mod podge, leaves, paintbrush and candles. (I used Yankee Candle- Harvest for my candles.) You may also want newspaper to protect your table and rubber bands for stubborn leaves.


Coat your jar with a layer of mod podge.


Place your leaves on top and coat with another layer of mod podge.
I broke off the hard stem of my leaves before using them on the jars.


Layer leaves around on the glass, overlapping slightly in a pretty pattern.


Let your jars dry overnight. If needed to back over stubborn edges that want to pop up with mod podge 
and help hold them down tight to the jar using rubber bands. I let my jars dry about 24 hours.

Place candles inside and light them for a pretty autumn lantern.


Happy Early Thanksgiving everyone!


Pin It!

Sunday, September 25, 2011

Pretty Fabric Tape {Tutorial}


I'm super excited to be sharing this fun project with y'all today*.
This is a fun tutorial for making your own fabric tape!
I just know you're going to love it!!!
Let's get started!


What you need:
fabric scraps
wax paper
matte mod podge
masking tape
paint brush
scissors
about an hour of time.


Step 1: Lay out a piece of wax paper and put strips of tap across it (sticky side down). Measure and cutt strips of fabric slightly larger than the tape. Don't worry if they aren't exact, we'll be trimming the edges later.
Step 2: Using the paintbrush and mod podge, coat each piece of tape with a thin layer of mod podge and then smooth your fabric down on top.
Step 3. WAIT! Let it dry! This was the hardest part! I think I gave mine about 30 minutes to dry.
Step 4: Turn your wax paper to the reverse side. Cut around the edges of the tape. This gets rid of the excess fabric overlapping the tape.

Ta-da you are done!


Then your tape is ready to use! The wax paper keeps your tape safe from sticking to everything until you are ready to use it! All you need to do then is peel off the wax paper from the back of the tape. 
Add a little of your pretty fabric tape to presents and packages for that extra personal touch!


Make as much tape as you have fabric and time! Such a fun and easy project!


xo's
Cat

*I shared this tutorial on another blog earlier this year but I wanted to share it here on my blog too!

Pin It!

Wednesday, June 15, 2011

Shimmering Stars Hair Accessories {a tutorial}

Don't you just want to wear these dreamy glittery star hair clips in your hair!? Well, I'm here with a tutorial to show you how to make them yourself! They're really simple! I made a bunch for my sister Sarah (who loves stars) for her birthday which is today!

★ ☆ Happy Birthday Sarah!★ ☆


Glitter Star Hair-clips

Here are the supplies you will need: 
foam stars (I got mine from the kids section in a craft store
hair clips and combs, you could even put them on a headband if you wanted!
mod podge
hot glue gun
glitter
small-medium paint brush for the mod podge


1. Lay out your stars and coat them with mod podge.


2. One by one sprinkle each with glitter. Once all the stars are covered let them dry. I let mine dry about an hour and went back and made sure the sides of the stars were covered well.


3. Using your hot glue gun, glue your stars to your hair clips of choice.


4. Once they are done see how many cute ways you can style your hair with stars!!


I can't wait for my sister to show me how she wears hers!! I got to see her squeal with delight when she opened her package yesterday on Skype! So fun!

Enjoy!

xo's
Cat

Pin It!

Monday, April 18, 2011

Moss Initial (Quick Tutorial)

I ordered the stuff to make this from Hobby Lobby forever ago, and it was my "me project" for March. 

I can't believe I'm only JUST NOW getting around to posting it! I'm such a slacker sometimes!

Here is a super quick tutorial!


All it takes is a big wooden letter, some fake moss, glue, scissors and ribbon.


I laid my letter out on the back side of the moss and trimmed around it, leaving enough to fold over all the edges.


You are warned, this is a VERY messy project!


Then, just hot glue down your moss all around and glue a ribbon on the back to hang it with.
(Note: I glued 2 separate ribbons on the back, and then made a bow out of another piece of ribbon and glued all of it together.)

Quick and easy!

I'm going to put it on my art wall in the living room. Here's the progress I've made so far.


 I have a few more things in mind to finish up the wall. I can't wait to bring it all together! I'm going to add my print from The Wheatfield and some sentimental pieces and a custom painting hopefully soon!

xo's
Cat

Pin It!

Tuesday, April 5, 2011

Cheeseburger Cupcakes - A Tutorial


Yes, I'm back with my tutorial for these super fun cheeseburger cupcakes you all loved so much!

For another fun snack idea check out these flower garden parfaits or this no-churn chocolate ice cream recipe!

First, I want to note that this is not a recipe, but only a tutorial on how to turn your cupcakes in to mini cheeseburgers.

You will need to following things first:
1 box yellow cake mix & added ingredients
1 box chocolate cake mix & added ingredients (I used devil's food)
2 cans frosting (maybe grab an extra for backup)
food coloring (I used Wilton's for candy molds and also the cheap liquid kind)
decorating tips and tool (mine was a super cheap on from Target I think)
sesame seeds, sugar, and brush
sharp knife
all the other essentials for baking cupcakes: cupcake pan, liners, oven :)


These are the 3 tips I used.
From left to right: Lettuce, cheese, and ketcup.


 Bake your cupcakes as directed and once cooled, cut your yellow cupcakes in half to make the bun.


 Then cut the tops off your chocolate cupccakes to make the burger. Some of mine were fatter than others. Experiment with the size you like.


 Mix up your frosting colors in seperate bowls. I used the wilton's candy mold dye for the red and green but for the yellow I found that I like the softness that the liquid drops gave it. Add color a little bit at a time until you get the darkness you want. Red is really hard to get dark enough, but do the best and trust me when it's put together they won't be looking at just the "ketchup".


 Dab a little bit of frosting on the bottom "bun" and place your "patty" on top.


 Using your "cheese" tip outline where the cheese would be. Make sure it's far enough to the edges to show when you put your top on. You don't need to worry about filling it in, nobody will see that part.


 Then add your "lettuce" using a swirly tip like the one I showed earlier.


Lastly, squirt a little "ketchup" all around. Making sure the leave a little bit over the edges so it's seen when the top is replaced.


Place the bun on top of your cupcake.
Now, if that's not cute enough on it's on, we're going to up the cuteness factor just that little bit more!


 Create a sugar mixture. I used 1/8 cup sugar, 1/4 cup warm water and mixed it well.


 Use this sugar mixture to wet the tops of your buns and then immediately sprinkle them with sesame seeds. Don't worry, you won't even taste these! You can't even tell you're eating sesame seeds but they really add to the look of the finished cupcakes!


And viola! Fun cheeseburger cupcakes!


Have them at a summer BBQ, office picnic, or neighborhood block party! I guarantee they will be a hit!

My husband took them to work and for the first few hours people actually thought they were little hamburgers but as soon as he let it out they were really cupcakes, they were gone lightning fast!


xo's
Cat

Pin It!