Photobucket      Photobucket      Photobucket      Photobucket      Photobucket      Photobucket      Photobucket      Photobucket
Showing posts with label diy. Show all posts

Tuesday, September 3, 2013

Giant Wall Abacus DIY


About half way through my pregnancy when I was searching for things to decorate the nursery with I kept stumbling upon wooden abacus toys. I liked the idea of making a giant wooden abacus for his wall above his changing table. For a while I wasn't sure how I was going to make it, but then with some help from my husband it all came together. 

This really became a family project with everyone helping, even Ariana painted some beads. I really love how it turned out and wanted to share how we made it. It's not as hard as it looks and it's great because you can customize the colors to match whatever room you are displaying it in.

So, let's get started!

Giant Abacus Wall Decor

Supplies:
- Piece of wood measuring 1.75 x 1in and at least  84 inches long - cut into 4 pieces total. 2, 18 inch pieces and 2, 24 inch pieces.
- Wooden beads. I ordered 100 of these 38mm/1.5 inch beads with a .5 inch hole from here. (We only used 80)
- Wooden dowels. We got our from the local hardware store 8mm/0.25inch in diameter and 23 inches long. We used 8 dowels.
- Paint and paintbrushes (white for frame, colors of choice for beads)
- Clear Gloss Spray Paint
- Drill and 8mm drill bit
- Ruler and pencil
- Nails and hammer

Optional Supplies:
Saw (to cut your wood or dowels if not precut)
Sandpaper
Newspaper or wax paper (for drying your painted wood on).


For bead colors I used these paints:

Craft Smart Acyrlic Paint - Mint Green (diluted with white)
DecoArt Dazzling Metallics silver sage (painted over white base)

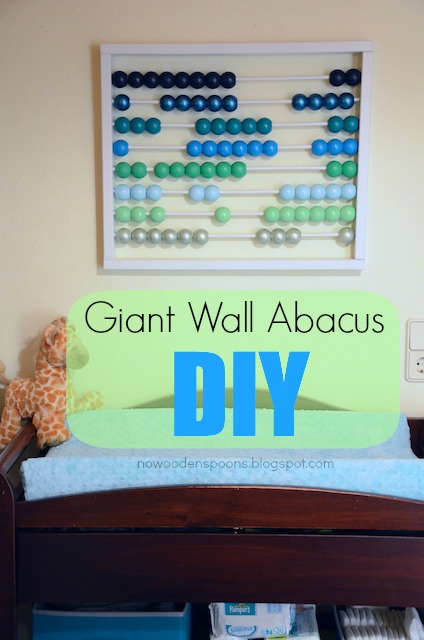
Note: Our giant wall abacus measures 24x18, and has 8 rows of beads. The following directions are for this exact abacus. If you want your abacus smaller or bigger use these directions as a starting off point.


1. Once you've bought all your supplies make sure your wood is cut to the sizes you need. Remember you will need 2, 18 inch pieces for the sides of your frame and 2, 24 inch pieces for your top and bottom. Your dowels need to be cut to measure 23 inches long.

2. On your 18 inch pieces of wood (your sides) use your ruler and make a mark in the center of your wood at the top and bottom. Using your ruler, connect the marks and make a line running down the center of your wood. Along the center line measure length wise and make 8 marks, 2 inchs apart. This is where you will drill holes for your dowels to go.


3. Make a mark 0.5 inch down on one of your dowels. Using your drill, along the marked spots, drill about 0.5 inch down on each piece of wood. Be careful to make sure the holes are straight and centered on each point that you made so they are centered. Check the depth using your dowel with the 0.5 inch mark. Your drill holes have to be at least 0.5 inches deep but it's okay if they are a little deeper.

4. If you need to, using the sandpaper, sand any rough edges you have on your wooden frame pieces and dowels. My wooden beads came very smooth so they didn't need any extra attention.


5. Now you can start painting! Painting your frame pieces white and your beads the colors of your choice. Each row will have 10 beads of a certain color. We made 8 rows of 10 beads each, so we used 80 beads in total. Add a second coat as needed.  Let them dry as directed.


6. Once all your pieces are painted and dry, outside or in a well ventilated area, use your clear spray paint to give them some shine. We only had to use this on our beads. The white paint for our frame was a semi- gloss and we thought it looked okay like it was. More drying, more waiting. This was the worst part.


7. You're almost done! Nail together one of your short pieces of wood to both of your long pieces. Then stick the dowels into the holes on the short piece of wood.

8. Thread your beads onto the dowels in the color pattern you want.

9. Once you have your beads in place, put the second short side onto your dowels. This part is a bit tricky lining up all the dowels exactly right and siding them into place. Once that is done you can hammer the last 2 corners. (I didn't take pictures of this part because it required a bit of work)

10. Attach a hanger on the back of your abacus and you are done! We used 3 sawtooth hangers on ours because it's pretty heavy. Hang and enjoy!


**Note this abacus is not made to be baby proof. This is for decoration only.


Pin It!

Sunday, August 18, 2013

Coffee Themed Back to School Teacher Gift!


In just over a week Ariana will be stepping into her German Immersion Kindergarten class for the first time. 

I'm trying not to get emotional about it, but this is the beginning of her full time, formal education for the next 13 years. Not just preschool but "real" school.

Ariana's not nervous at all, and already knows her teacher since she's seen her around CLA. She's excited to have real school supplies this year. A primary notebook, folders, her own pencil box!

To help us prepare for the big day we put together a little coffee themed goodie bag for our teacher to help her get back into "the grind".

See more of our back to school teacher gift at The Shopping Mama and see what all we put in there or what other suggestions might work if you wanted to make something similar for your own kid's teachers this year.

There is also a free printable for the gift tag that I created to make putting together your gift a little easier!


Pin It!

Thursday, January 24, 2013

DIY: Birth Stats Subway Art

A few months ago I came across this post where you could print out subway art to decorate with. From that I was inspired to create some pretty "subway art" of my own featuring Ariana's birthday stats.


I opened a blank page in picmonkey and played around different fonts, texts, sizes and moving it around until I liked how it looked. I used black, gray and yellow for my alternating text colors. Changing ended up changing the fonts to make each line stand out.


I printed it on regular printer paper and mod podged it onto a black canvas I had lying around. I painted the border of my canvas a matching yellow color and gave it a thin layer or mod podge over the top of the paper. It's not perfectly smooth but I like the textures it gives it.


It's displayed on a shelf in the living room by a picture of me and Ariana on my first Mother's Day.

It was a simple project for a personalized piece of artwork. You should make one too! It would even be fun to do with wedding dates, places, times!

Pin It!

Tuesday, July 31, 2012

Busy Book {DIY}


Check out my other fun DIY activities and crafts for kids!


For our 9 hour flight from Germany to Florida, I created a "busy book" for Ariana. I had this idea in my head of activities I knew she would like so I decided to put it together the last few days I was in Germany. It was so simple. I got a 3 ring binder, some folder dividers, and some plastic sheet protectors. I printed off a bunch of fun pages I found online and made some of my own. For the coloring pages I put them in the folder dividers so she could pull them out and color them and for some of the other pages like matching etc I put them in the sheet protectors so she could draw on the plastic with dry erase markers and reuse some of the pages.

Here is a peek into her "busy book".

 Ariana loves color by number so I googled that and printed off about 10 pages of color by numbers. I also printed worksheets with shapes.
 She loves to color animals and I found these great pages with pictures and words. We also made the fun number book where they circle all the number 1's on one page, 2's on another page, etc
 Things that are opposite and things that go together pages were a big hit. The ABC maze took some concentration.
 I created our own uppercase and lowercase letter matching pages and she loved the thinking pages like "which way is the animal facing" and such.
Hidden pictures are usually a favorite with her so I got some from Highlights website. Also added in more counting pages.

These pages are just some of what are in her "busy book", there are over 60+ pages of fun activities. If you want to make your own "busy book" for your little one, I've linked some of the best websites I found when making our book.


Websites I printed from:

Check out these other creative kid crafts on my sister site!

It kept her entertained for a few hours of our flight although some of it took assistance from me to read the directions. Perfect for kids who need stimulation and something to think about. This could also be used if you homeschool as worksheets or just if you have little ones who need some fun activities to do inside on a rainy day etc.


Pin It!

Monday, July 16, 2012

Birthday in a Box! {DIY}


The 'birthday in a box' idea came to me when I was trying to think of something creative to send to my sister for her birthday in June. I have no idea if it's been done before or not. I love surprising my friends and family with creative things for their birthday's/holidays. The year of my sister's 21st birthday I mailed her 21 booze/party/21 related cards in the mail for her to open one each day, the 21 days leading up to her birthday. That was fun! This year since we're trying to save money (21 cards was expensive) I decided to do mail her something fun. 

I'm going to be honest here. I was relying on the postal services between Germany and the United States and I wasn't sure how balloons would react to be mailed/flown overseas. Luckily all but 2 made it, those two deflated.


STEP 1: Gather your supplies. A big box, balloons, money, glitter, tissue paper, confetti, funnel and packing materials. I made confetti by hole punching colorful paper and used gold glitter.


STEP 2: Fold your money into tiny squares and put them inside your balloons. This may take some patience. 


STEP 3: Using a funnel, put the glitter and confetti into the balloons. Blow your balloons up and tie them off. Remember they'll take up a lot of space in your box, experiment with sizes.


 STEP 4: Tape a pin into a card with a clever message. The glitter will go everywhere so warn them not to do it inside unless you want them to have to clean up a mess. (I added glitter inside my card too)

See results of pin vs balloon below.


 (My husband helped me test it out in the backyard to see how the glitter would fly.)

STEP 5: Fill your box with balloons, colorful tissue paper (and bubble wrap if you'd like, I did) and mail it off. Or drop it off at your friends doorstep, either way they're sure to be delightfully surprised!


Viola! There you have it! I fun birthday in a box!

Pin It!

Sunday, September 25, 2011

Pretty Fabric Tape {Tutorial}


I'm super excited to be sharing this fun project with y'all today*.
This is a fun tutorial for making your own fabric tape!
I just know you're going to love it!!!
Let's get started!


What you need:
fabric scraps
wax paper
matte mod podge
masking tape
paint brush
scissors
about an hour of time.


Step 1: Lay out a piece of wax paper and put strips of tap across it (sticky side down). Measure and cutt strips of fabric slightly larger than the tape. Don't worry if they aren't exact, we'll be trimming the edges later.
Step 2: Using the paintbrush and mod podge, coat each piece of tape with a thin layer of mod podge and then smooth your fabric down on top.
Step 3. WAIT! Let it dry! This was the hardest part! I think I gave mine about 30 minutes to dry.
Step 4: Turn your wax paper to the reverse side. Cut around the edges of the tape. This gets rid of the excess fabric overlapping the tape.

Ta-da you are done!


Then your tape is ready to use! The wax paper keeps your tape safe from sticking to everything until you are ready to use it! All you need to do then is peel off the wax paper from the back of the tape. 
Add a little of your pretty fabric tape to presents and packages for that extra personal touch!


Make as much tape as you have fabric and time! Such a fun and easy project!


xo's
Cat

*I shared this tutorial on another blog earlier this year but I wanted to share it here on my blog too!

Pin It!

Friday, September 23, 2011

Kid's Kaleidoscope Craft!


Ariana and I made this kaleidoscope for letter K week and as promised, I'm back to show you how you can make your own.


supplies:
empty Pringles can, with lid (that part is important)
paints and brushes
tissue paper
glue (Elmer's and super glue)
glitter (optional)
contact paper

You will also need a nail, hammer, and scissors.

Step 1: Paint the outside of your empty can. We sponged on a few bright colors. Let the can dry while you work on the other parts.


Step 2: Tear up different colored tissue paper. In a small cup or bowl mix together some Elmer's glue, little bit of water and glitter if you opted to use it. After I created this, I realized the glitter doesn't do much, but it's still fun and the kids love shaking some in!


Step 3: On the outside of the lid, paint on the glue and layer the scraps of tissue paper. Make it messy. Finish it off with another coat of glue.


Step 4: Cut 2 small squares of contact paper (larger than your lid). Lay one sheet stick side up and layer on scraps of tissue paper. Sandwich the tissue paper between the 2 pieces of contact paper. Trace a circle with your lid and cut it out. Place the contact paper circle onto the open end of your can. Glue it on. This is where I used the super glue. Elmer's glue won't hold it and it needs to be flush to the can so that you can put the lid on later.


Step 5: Once all the paint and glue is dry you're ready to assemble your kaleidoscope. Place the lid on top of the can. This will cover the contact paper and create two layers. You should be able to twist the lid.

Step 6: Lastly, using a small nail and hammer gently tap a hold in the bottom of the can for viewing.


And now you're ready to play with your kaleidoscope!


Pin It!